Pages

Showing posts with label Debian. Show all posts

Sunday, 5 February 2012

Upgrading Debian From i386 To amd64

                                                          Upgrading Debian From i386 To amd64

Check wether your Intel/AMD processor supports the 64-bit "long mode"


grep -q '^flags.* lm ' < /proc/cpuinfo && echo yes

If you compile you own 64-bit kernel on the still 32-bit system you just have to install the package gcc-multilib and to start make with :

ARCH=x86_64 make

At the end your 64-bit kernel will smile in arch/x86_64/boot/.
Setup your bootloader to start it with and reboot your system.

Create a 64-bit mini system

mkdir /chroot64
apt-get install debootstrap
debootstrap --arch amd64 wheezy /chroot64 http://ftp.debian.org/debian

"Login" into your mini system and add some more packages:
chroot /chroot64
apt-get install file bzip2 openssh-client lftp
<CTRL-D>

Create a list of the 64-bit binaries of the mini system


The mini system is what you want as your main system apart from the facts that a)it comprise a lot less packages and b) it's not you main system just a sandbox now. We will disperse this sand onto the main, but only the executables, all other files (e.g. your adored config files in /etc remain intact), so collect them:

cd /chroot64
find . -depth | while read f
do
if file -L "$f" | grep -q ELF
then
echo "$f" >> /tmp/bins.txt
fi
done
echo "./etc/ld.so.cache" >> /tmp/bins.txt

Note1: you could run the commands in the chroot too, but then you have to go to its root 'cd /' at first and your 'bins.txt' come off in /chroot64/tmp.
Note2: the last command, adding the ld.so.cache is crucial! It's not an executable, but needed by the dynamic linker (ld.so).

Upgrade your 32-bit system closest to the mini system


In order to have your 32-bit system as much as compatible (from the configuration files POV) to your mini 64-bit system, upgrade all your packages you have installed in the 64-bit mini root.

#chroot /chroot64
#dpkg --get-selections|awk '{print $1}' > /tmp/minipackages.txt
#<CTRL-D>
#apt-get update
#apt-get install `cat /chroot64/tmp/minipackages.txt`

Boot your rescue disk


One step must be done from an external system (Live Linux CD), because you cannot change the very base binaries beneath youself. Or at least it would be quiet risky. So, get a system rescue linux CD or USB stick based distro. One of my favourite is [http://blag.chaox.net/|Chaox]. It has a very recent kernel, it's tiny, it has all the important system tools and even an X interface with nvidia proprietary driver and works both from CD and from USB out of the box.
After you booted it mount your main system eg. under /main:

#mkdir /main
#mount /dev/sda1 /main
#cd /main
#ls   # check if it's really the root of your main system
#cat etc/fstab # see all your other filesystems, eg: /usr
#mount /dev/sda8 /main/usr
#mount /dev/sda11 /main/tmp
...

Overwrite your 32-bit base system


Overwrite the binaries of your main system from the 64-bit mini root:
#cd /main/chroot64
#cpio -pVdu /main < /main/tmp/bins.txt
Unmount all your mounted partitions:
#umount /main/tmp
#umount /main/usr ...
#umount /main

Reboot to your 64-bit system


Now since the all the minimalistic, most important part of your system (binaries and libraries) are 64-bit, you can boot it! Of course the 99% of your system is still 32-bit. They will most probably not work, because the rudimentary libraries are already 64-bit and the dynamic loader will complain it about. You will have a terrible boot :-), but you will able to login and use the base system.
Once in this point I got the following friendly message:

run-init: /sbin/init: No such file or directory
Kernel panic - not syncing: Attempted to kill init!

I booted from USB again and saw that the /sbin/init is there and it's a good 64-bit exec. Kernel lies! Or don't? Just a bit. The init is there but init wanted to load the libc6.so. Of course the 64-bit version which resided in /lib64. On the mini root system there were a symlink: /lib -> /lib64. So I created the symlink (sill using the rescue image) and the next boot succeeded, sigh.

Reinstall all the packages

apt-get install -f

you will need your own creativity, because the issues you will have are always differ. I could not do two migration with the same problems. I can therefore tell you about some common case you will probable experince too. After each fix I'll write here below about you can repeat your previous installation step and it will goes further.

  • libc will not be upgraded automatically
Internal Error, Could not perform immediate configuration (2) on libc6

E: Could not perform immediate configuration on 'libc6'.Please see man 5 apt.conf under APT::Immediate-Configure for details. (2)

Apt downloaded libc6-amd64, but don't dare to exchange it, because it's another architecture. (It does not know, that it is already changed, so it would do nothing just update its own database.) So, you have to help it:

#cd /var/cache/apt/archives
#dpkg -i libc6*deb
Then you can continue the 'apt-get install -f'.
  • clashing libs
The dynamic loader (at the time of writing) does not support to have the 32-bit and the 64-bit version of the same library (soname) in the same directory. If you see warnings like:

ldconfig: libraries libz.so.1.2.3.0 and libz.so.1.2.3.3 in directory /usr/lib have same soname but different type.


you should go there and check, which is the 32-bit version. It won't be needed any more, so you can simply delete it:

# cd /usr/lib
# ls -l libz.so*
lrwxrwxrwx 1 root root    15 Dec 30 21:25 libz.so -> libz.so.1.2.3.4
lrwxrwxrwx 1 root root    15 Dec 30 21:25 libz.so.1 -> libz.so.1.2.3.4
-rw-r--r-- 1 root root 93936 Dec 28 20:10 libz.so.1.2.3.4
-rw-r--r-- 1 root root 93936 Jun 18 11:14 libz.so.1.2.3.0

# file libz.so.1.2.*
libz.so.1.2.3.0: ELF 32-bit LSB shared object, Intel 80386, version 1 (SYSV), dynamically linked, stripped
libz.so.1.2.3.4: ELF 64-bit LSB shared object, x86-64, version 1 (SYSV), dynamically linked, stripped

# rm libz.so.1.2.3.0
# ldconfig   # now you won't get complains about libz


Such warnings are frequent if your old system lags more from the current unstable one, because then the new version of the same libs could have another version, so they won't be simply overwritten.
  • missing "base" packages
Many poinstall scripts want to start 'menu' and 'pyhon'. But apt-get not enough clever to start the package reinstallation with them, you can help again. If you see messages 'update-menus failed', that's about the package 'menu', and 'update-menus' is called from a dpkg hook.

#cd /var/cache/apt/archives
#dpkg -i menu*
#dpkg -i python*

  • debsums does not work
In case you get errors because not working perl module MD5, which is actually a binary perl module, you can install it manually too. Sometimes a package reinstallation complains, because in the older packages some files belonged to another package and then dpkg don't want to overwrite them, you have to force it:

#cd /var/cache/apt/archives
#dpkg -i --force-overwrite perl*

  • reinstall of doc-base failed
Doc base uses ndbm database files (files.db and status.db) which are seemingly architecture specific. The update procedure of the 64-bit doc-base cannot read the remained 32-bit ones. Don't care, they will be regenerated if you delete them:

#cd /var/lib/doc-base/info
#rm files.db status.db

Resinstall all remained 32-bit packages


Sometimes after 'apt-get install -f' succeeds everything is done, your system is migrated. But sometimes a dozen of packages remains 32-bit. They either work (if they find their 32-bit libs) or not. But in any case it's better to reinstall them too. To list what packages are they do the following query:

dpkg-query -W -f '${Package} ${Architecture}\n' | awk '/i386$/ {print $1}'


I like this migration method also because at this point a lot of package could crop up which are not more exists (installed 5 years ago, not needed any more and you haven't even know what they are. You can purge them now gloatingly.
If you want to reinstall all i386 packages:

apt-get install `dpkg-query -W -f '${Package} ${Architecture}\n' | awk '/i386$/ {print $1}'`


But of course it will stop if there are no more existing packages. Then you can "apt-get purge" the really not needed ones, and try the reinstallation command again.
If you system do have tons of such not upgradable packages then you could find this procedure tiring, then you can decide you will care for them later, just the let upgradeable be upgraded, you can perform the command for each package separately:

for p in `dpkg-query -W -f '${Package} ${Architecture}\n' | awk '/i386$/ {print $1}'`
do
  apt-get -y install $p
done


it is slower (reads the apt db for every single package), but it skips the not upgradable ones.
And when you have time and are in the humor to entertain yourself with the remained i386 "what the hell are they" packages, you can list them with their description and judge on their life or death:

# dpkg-query -W -f '${Architecture} ${Package} ${Description}\n' | awk '/^i386/ {print; getline; for(;$0 ~ /^ /;getline) print; print "\n";}'
i386 pbzip2 parallel bzip2 implementation
 pbzip2 is a parallel implementation of the bzip2 block-sorting file
 compressor that uses pthreads and achieves near-linear speedup on SMP
 machines. The output of this version is fully compatible with bzip2
 v1.0.2 (ie: anything compressed with pbzip2 can be decompressed with
 bzip2).


i386 pcscd Middleware to access a smart card using PC/SC (daemon side)
 The purpose of PC/SC Lite is to provide a Windows(R) SCard interface
 in a very small form factor for communicating to smart cards and
 smart cards readers.
 .
 The PC/SC daemon is used to dynamically allocate/deallocate reader
 drivers at runtime and manage connections to the readers.
...
I've done this procedure many times beleive it or not, it's safe, real geeks could even enjoy it. And if you failed (but you would not!) then you could still install the system in the way you would done without this guide.

Friday, 3 February 2012

Buil Customs Kernel on Debian How to ??

Buil Customs Kernel on Debian How to ??

This Will Give U a Complete Procedure How To Compile Kernel on Debian on Right Way :

I give Wheezy Try :

If you're going to follow the procedures recommended in this document, your non-root user account must be enrolled in the "src" group.  For example,
 
          # mkdir /usr/src/build
          # mkdir /usr/src/build/kernel
# adduser fa src

Also, make sure that the directory /usr/src is owned by user root and by group src, and that the group has read and write privileges on the directory.  Execute privileges on the directory should be granted to all users (user, group, and other).  Also, make sure that the "set-group-ID" file mode bit is set for the directory.  This can be checked by issuing "ls -ld /usr/src".  The "s" flag will show in the output.  For example:
 
           $ ls -ld /usr/src drwxrwsr-x 3 root src 4096 Aug 24 13:52 /usr/src

The letter "s" in the seventh position of the file attributes indicates that the "set-group-ID" file mode bit is set for the directory.  This used to be the default, but on a recent install of Squeeze I've seen this change.  If it is not set, set it using the following command:
 
          #chgrp -R usr /usr/src
          # chmod g+s /usr/src
          #chmod -R g+w /usr/src
          #chown -R fa:src /usr/src/build/kernel -> change 'fa' with your own username

(Any changes to the privileges on the /usr/src directory must be done by root.)  Once you select a non-root user account for kernel-building purposes, you must use that same userid for all non-root steps.
Update The Sources.lit , Here My Example :

deb http://ftp.debian.org/debian/ wheezy main non-free contrib
deb-src http://ftp.debian.org/debian/ wheezy main non-free contrib
deb http://security.debian.org/ wheezy/updates main non-free contrib
deb-src http://security.debian.org/ wheezy/updates main non-free contrib

U can add the Mirror To add Faster Repository :
deb http://ftp.us.debian.org/debian wheezy main non-free contrib
deb-src http://ftp.us.debian.org/debian wheezy main non-free contrib
deb http://debian.corenetworks.net/debian/ wheezy main contrib non-free
deb-src http://debian.corenetworks.net/debian/ wheezy main contrib non-free
deb http://debian.mirrors.tds.net/debian/ wheezy main contrib non-free
deb-src http://debian.mirrors.tds.net/debian/ wheezy main contrib non-free
deb http://ftp.utexas.edu/debian/ wheezy main contrib non-free
deb-src http://ftp.utexas.edu/debian/ wheezy main contrib non-free
deb http://mirrors.xmission.com/debian/ wheezy main contrib non-free
deb-src http://mirrors.xmission.com/debian/ wheezy main contrib non-free


When mixing releases in the same system, it is important to define the default release.  You do this in /etc/apt/apt.conf.  Put a line such as the following in the above-named file:
 
APT::Default-Release "wheezy";
     Aptitude::Purge-Unused "true";
     
Then use :
 
#aptitude updade && aptitude full-upgrade
          #update-initramfs -u -k $(uname -r)

to install the updates.  If you are running the testing release or the unstable release, you should perform this procedure regularly, since updates are not generally announced.  When you are finished installing package updates, use 
 
#aptitude clean

Got The Source From Here :

$cd /usr/src
$links http://www.kernel.org/

choose  the kernel version you need, grab it with push 'D'

untar it, i use kernel 3.2.2 , so the command wil be :

tar -xjf linux-source-3.2.2.tar.bz2

Do this step as root.  If you have not already done so, install the "kernel-package" package.  You can check to see if it is already installed by using
 
dpkg-query -l kernel-package|grep ii
If it is not already installed, install it. 
 
aptitude install kernel-package

Read the README file for kernel-package.
 
zless /usr/share/doc/kernel-package/README.gz

At the time of this writing, the following packages will be required for the menuconfig method under Debian Squeeze:
 
gcc
     libc6-dev
     bin86 (i386 and amd64 architectures only)
     libncurses5-dev
     binutils
     make
     module-init-tools
     mawk | gawk
     gzip
     coreutils
     grep
     zlib1g-dev (if CONFIG_LGUEST is set)
     fakeroot (if building the kernel as a non-root user)

Many of these packages will already be installed.  To check to see if these packages are installed, use dpkg-query.  For example:
 
dpkg-query -l gcc|grep ii

Install those packages which you need with "aptitude install".  For example:
 
aptitude install bin86 libncurses5-dev zlib1g-dev fakeroot && aptitude clean

There may also be some packages needed to install the kernel image package once it has been built.  For example, you may need initramfs-tools to build the initial RAM file system image file during kernel image package installation.  (But it should be installed already.)

At this point I recommend that you edit the kernel-package config file (/etc/kernel-pkg.conf) and change the "maintainer" and "email" tags to your own name and e-mail address.

No need for the patch since we use 64 kernel, i think so :
but if you are using 32 bit , you wiill need it for patch the Doumentation.

No apply the patch, issue the following sequence of commands:
 
cd /usr/share/kernel-package
     ... (download the patch file to the current directory)
     patch -p1 <patch3xx.diff

Configure The Kernel :

Do this step as a non-root user.  Use the same userid for all non-root steps.  The non-root user must be a member of group "src".  First, change directories to the home directory for the source code.
 
cd /usr/src/build/kernel/linux-source-3.2.2

Now, initialize the .config file based on the configuration file used by the stock Debian kernel.
 
cp /boot/config-2.6.32-5-686 .config

This means that if you make no changes, your custom kernel will be configured exactly like the stock Debian kernel.  Obviously, adjust the name of the config file to copy based on your architecture and kernel release.  The file you need will start with "config" and will have your kernel version name in it.
Now it's time to configure the kernel:
 
make menuconfig

OK, with all that said, we are ready to start issuing commands.  If you are running Lenny (or previous releases), issue the following command:
 
make-kpkg clean

Under Lenny and previous releases it is necessary to run make-kpkg with the "clean" target after each invocation of "make menuconfig" (or any *config target, actually).  Otherwise, the --append-to-version and/or the --revision flags won't work properly.  If you are running Squeeze or later releases, the above command may be omitted.  (But if you do run it under Squeeze and later releases, it won't do any harm.)  Now issue the following command to build the package(s):

This For Debian Kernel Ways : ( If you download it from Debian Repository) :
 
time CONCURRENCY_LEVEL=8 make-kpkg --append-to-version -5custom1-686 --revision 2.6.32-38 --initrd --rootcmd fakeroot kernel_image modules_image
And This For My Own Ways, since it from Kernel Source :

CONCURRENCY_LEVEL=8 fakeroot make-kpkg --append-to-version -2fa4-666 --revision 7.5.88-1 --initrd kernel_image kernel_headers

Even if you are running Squeeze or later I suggest that you read this section because material covered here is assumed as background knowledge in later sections.
The /etc/kernel-img.conf file for a default Lenny installation on the i386 architecture with the grub version 1 boot loader (the default) looks something like this:
 
# Kernel image management overrides
     # See kernel-img.conf(5) for details
     do_symlinks = yes
     relative_links = yes
     do_bootloader = no
     do_bootfloppy = no
     do_initrd = yes
     link_in_boot = no
     postinst_hook = update-grub
     postrm_hook   = update-grub


Now We Already Have a new kernel, it;s time to install it :
Do this step as root.  OK, now it's time to actually install the kernel image package.  You won't use aptitude or apt-get to install the kernel image package.  That is due to the fact that it doesn't have to be fetched from anywhere.  Instead, use the low-level package tool dpkg.
 
cd /usr/src dpkg -i linux-image-2fa4-666_7.5.88-1_amd64.deb

Do this step as root.  Shutdown and reboot to run your new custom kernel!
 
shutdown -F -r now;exit

Now i't time to clean up home :
Do this step as a non-root user.  Use the same userid for all non-root steps.  The non-root user must be a member of group "src".  Once the new kernel image package has been installed, you can delete the package file (.deb file). 
 
#cd /usr/src/build/kernel
#rm linux-image-2.6.32-5custom1-686_2.6.32-38_i386.deb
If you have also installed one or more modules image packages, you can delete their package files too.  The same goes for a linux-headers-* package.

Clean Up :
Do this step as root.  Once you are satisfied with the new kernel, you may wish to de-install the old kernel image package.  I like to keep at least one back version unless I know that the old kernel will no longer work due to changes made since migrating to the new kernel.  For example, if my system now depends on a kernel module that did not exist in the old kernel, there's not much point in keeping the old kernel around.
 
aptitude purge linux-image-2.6.32-5-686

Done.,
:)

Thursday, 2 February 2012

Move /home to it’s own partition Debian

First, create a partition of sufficient size for your “/home” directory. You may have to use that new hard drive, or adjust/resize the existing partition on your current hard-drive to do this. Let me skip those details.
Next, mount the new partition:

$mkdir /mnt/newhome
$sudo mount -t ext3 /dev/hda5 /mnt/newhome


(You have to change the “hda5″ in the above to the correct partition label for the new partition. Also, the above assumes that the new partition you created is formatted as an ext3 partition. Change the “ext3″ to whatever filesystem the drive is formatted to.)
Now, Copy files over:
Since the “/home” directory will have hardlinks, softlinks, files and nested directories, a regular copy (cp) may not do the job completely. Therefore, we use something we learn from the Debian archiving guide:

$cd /home/
$find . -depth -print0 | cpio --null --sparse -pvd /mnt/newhome/


Make sure everything copied over correctly. You might have to do some tweaking and honing to make sure you get it all right, just in case.
Next, unmount the new partition:

$sudo umount /mnt/newhome


Make way for the new “home”

$sudo mv /home /old_home

Since we moved /home to /old_home, there is no longer a /home directory. So first we should recreate a new /home by:

sudo mkdir /home


Mount the new home:

$sudo mount /dev/hda5 /home


(Again, you have to change “hda5″ to whatever the new partition’s label is.)
Cursorily verify that everything works right.
Now, you have to tell Debian to mount your new home when you boot. Add a line to the “/etc/fstab” file that looks like the following:

/dev/hda5 /home ext3 nodev,nosuid 0 2


(Here, change the partition label “hda5″ to the label of the new partition, and you may have to change “ext3″ to whatever filesystem you chose for your new “home”)
Once all this is done, and everything works fine, you can delete the “/old_home” directory by using:

$sudo rm -r /old_home


This for Complete Task :

Use the following
mkdir /mnt/newhome
sudo mount -t ext3 /dev/sda10 /mnt/newhome
cd /home/
find . -depth -print0 | cpio --null --sparse -pvd /mnt/newhome/
Next, unmount the new partition:
sudo umount /mnt/newhome
Then make way to the new home
sudo mv /home /old_home
sudo mkdir /home
Mount the new home:
sudo mount /dev/sda10 /home
Now, you have to tell Debian to mount your new home when you boot. Add a line to the “/etc/fstab” file that looks like the following:
/dev/hda5 /home ext3 nodev,nosuid 0 2
Sudo rm -r /old_home

Gentoo minimal CD on USB stick


mkdir /downloads
cd /downloads
wget http://distfiles.gentoo.org/releases/amd64/autobuilds/current-iso/install-amd64-minimal-20120126.iso

emerge the necessary tools

emerge syslinux on gentoo

#aptitude install syslinux -> but i bypass this part

Note: you can also directly download syslinux and find the mbr.bin inside that bz2 files.

Find your usb flash drive

fdisk -l

Unmount if mounted

umount /dev/sdb1

Clear disk partition table and boot sector

dd if=/dev/zero of=/dev/sdb count=1024

Create a partition table with 512-byte sectors and a primary partition of type 83 (ext2) with fdisk and make it bootable

fdisk -b 512 /dev/sdb
n p 1 enter enter
t 83
a 1
p
w

Device     Boot      Start        End      Blocks   Id  System
/dev/sdb1   *           1        1009      500433   83  Linux

Formate the partition ext2 and tune it

mkfs.ext2 /dev/sdb1
tune2fs -i 0 /dev/sdb1

#aptitude install mbr syslinux mtools extlinux rsync

dn't use it, if u don'y know what will u doing.
install the mbr
mbr-install /dev/sdb

in other ways safe u can install grub or lilo
grub-install /dev/sdb

Note: the listing above is for Debian only. If you are using others, the listing above can be ignored.

download my mbr.bin from this.

extract wherever u cose
in my place : root@fa:/home/fa/syslinux#dd if=/home/fa/syslinux/mbr/mbr.bin of=/dev/sdb

mount the usb flash drive and disk image. If the device folder doesn't exist, please create them before conducting the following listing.

mount -t ext2 /dev/sdb1 /mnt/usb
mount -t iso9660 -o loop,user /downloads/install-x86-minimal-2008.0.iso /mnt/cdrom

install the system files

cd /mnt/usb/
cp -r /mnt/cdrom/* /mnt/usb/
mv isolinux extlinux
mv extlinux/isolinux.cfg extlinux/extlinux.conf
rm extlinux/isolinux.bin
rsync -av extlinux

install the bootloader

cd /mnt
extlinux -i /media/usbdisk/extlinux
umount /media/usbdisk

reboot, press F9 then insert gentoo-nofb
Note: Some older machines will not boot a usb formatted in ext2.
after that, go to this places

Monday, 30 January 2012

How to Configure bRoadcom on Linux

Since i am is Debian users as well, it's simple ways to setup broadcom sta bcm4313 :

On This Tutorial


Add a "non-free" component to /etc/apt/sources.list, for example:
# Debian Wheezy (testing)
deb http://ftp.us.debian.org/debian wheezy main contrib non-free

  1. # aptitude update
    # aptitude install firmware-brcm80211 wireless-tools
  2. As the driver may already be loaded, reinsert the module to access installed firmware:
    # modprobe -r brcmsmac ; modprobe brcmsmac
  3. Verify your device has an available interface:
    # iwconfig
    To find the Device ID's of Broadcom cards on your machines do:
    # lspci -n | grep 14e4
    # lsmod  | grep "b43\|ssb\|bcma\|wl"
    
    If you try to build this module but get an error message that looks like 
    this:
    
    make: *** /lib/modules/"release"/build: No such file or directory. Stop.
    
    Then you do not have the proper packages installed, since installing the 
    proper packages will create /lib/modules/"release"/build on your system.
    
    On Ubuntu, you will need headers and tools.  Try these commands:
    # apt-get install build-essential linux-headers-generic
    # apt-get build-dep linux
    
    To check to see if you have this directory do this:
    
    # ls /lib/modules/`uname -r`/build
    
    BUILD INSTRUCTIONS
    ------------------
    1. Setup the directory by untarring the proper tarball:
    
    For 32 bit:  hybrid-portsrc.tar.gz
    For 64 bit:  hybrid-portsrc-x86_64.tar.gz
    
    Example:
    # mkdir hybrid_wl
    # cd hybrid_wl
    # tar xzf <path>/hybrid-portsrc.tar or <path>/hybrid-portsrc-x86_64.tar.gz
    
    2. Build the driver as a Linux loadable kernel module (LKM):
    
    # make clean   (optional)
    # make
    
    When the build completes, it will produce a wl.ko file in the top level
    directory.
    This driver now supports the new linux cfg80211 wireless configuration API in
    addition to the older Wireless Extensions (Wext).  The makefile will
    automaticly build the right version for your system but it can be
    overridden if needed:
    
    # make API=WEXT
     or
    # make API=CFG80211
    
    # rmmod wl 
    # mv <path-to-prev-driver>/wl.ko <path-to-prev-driver>/wl.ko.orig
    # cp wl.ko <path-to-prev-driver>/wl.ko
    # depmod
    # modprobe wl
    
    The new wl driver should now be operational and your all done.
    
    Fresh installation:
    
    If any of these are installed, remove them:
    # rmmod b43
    # rmmod ssb
    # rmmod bcma
    # rmmod wl
    
    To blacklist these drivers and prevent them from loading in the future:
    # echo "blacklist ssb" >> /etc/modprobe.d/blacklist.conf
    # echo "blacklist bcma" >> /etc/modprobe.d/blacklist.conf
    # echo "blacklist b43" >> /etc/modprobe.d/blacklist.conf 
    # echo "blacklist b43legacy" >> /etc/modprobe.d/blacklist.conf
    # echo "blacklist brcmsmac" >> /etc/modprobe.d/blacklist.conf
    # echo "blacklist brcmfmac" >> /etc/modprobe.d/blacklist.conf
    # echo "blacklist brcm80211" >> /etc/modprobe.d/blacklist.conf
    
    # insmod <path-to-driver>/wl.ko
    # modprobe wl
    
    wl.ko is now operational.  It may take several seconds for the Network 
    Manager to notice a new network driver has been installed and show the
    surrounding wireless networks.
    
    If there was an error, see Common isstes below.
    
    Common issues:
    ----------------
    * After the insmod you may see this message:
      WARNING: modpost: missing MODULE_LICENSE()
      It is expected, not harmful and can be ignored.
    
    * If you see this message:
    
      "insmod: error inserting 'wl.ko': -1 Unknown symbol in module"
    
      Usually this means that one of the required modules (as mentioned above) is
      not loaded. Try this:
      # modprobe lib80211 or ieee80211_crypt_tkip (depending on your os)
      # modprobe cfg80211
        
      Now re-try to insmod the wl driver:
      # insmod wl.ko
      
    * If the wl driver loads but doesn't seem to do anything:
      the ssb module may be the cause.  Sometimes blacklisting ssb may not
      be enough to prevent it from loading and it loads anyway. (This is mostly
      seen on Ubuntu/Debian systems).
    
      Check to see if ssb, bcma, wl or b43 is loaded:
      # lsmod | grep "ssb\|wl\|b43\|bcma"
    
      If any of these are installed, remove them:
      # rmmod ssb
      # rmmod bcma
      # rmmod wl
      # insmod wl
    
      Back up the current boot ramfs and generate a new one:
      # cp /boot/initrd.img-`uname -r` somewheresafe
      # update-initramfs -u
      # reboot

Saturday, 28 January 2012

Unable To Boot Into Windows After Updating Debian into Wheezy??

Recently updated Debian on to unstable or testing version and unable to boot into Windows on a dual boot system since then? The system does not show up the boot loader menu after updating Debian? Or your computer system fails to recognize any Operating System after you updated Debian. Facing any or all of the above issues after updating Debian? Scared that you will lose all your files? You do not need to worry any more! Let us Re-install and recover the Windows boot loader to fix the errors that are preventing you from booting into Windows after updating Debian.
Updating GRUB (with the wrong options selected) while updating Debian usually results in this issue. After completely updating Debian on your system and rebooting it you may be unable to boot into Windows as your system only detects Debian or no operating system installed in your system, maybe it detect Windows but cannot log in into it because wrong drive disk section. To fix these problems we need to re-install or just simple fix Windows boot loader for your system to start detecting the Windows operating systems as it used to before updating Debian.
Here are the steps to re-install and recover Windows boot loader and to boot into both Windows normally after updating Debian.
Step 1 - Configure Boot Sequence -
If your boot sequence has boot from CD/DVD ROM as the first preferred device (that is, if you are able to directly boot from CD/DVD ROM after just inserting the DVD and rebooting your system) then you may skip this step.
We need to re-install the Windows boot loader from a Windows Installation DVD (Windows Vista or Windows 7). In order to make the computer system boot from the Windows Installation DVD (Windows Vista or Windows 7) we need to set the first preferred boot device as the CD/DVD ROM device instead of HDD which is usually the first preferred boot device.
To change the boot sequence you need to change the boot settings in BIOS. To access the BIOS, press the Delete or F2 or F10 key (depends on your computer system) on the very first screen that you see after switching on your computer system, that is, press any one key (depending on your computer system) when you see the very first boot screen (can be the Company Logo screen) to enter the BIOS setup.
Or maybe you just need log into grub and find your windows 7 recovery path.
Screen-shot:

Use Metode 1 :Save the new boot settings, insert the Windows Installation DVD (Windows Vista or Windows 7) in the CD/DVD ROM and restart the computer system.
If you have successfully changed the boot settings and have inserted the Windows Installation DVD you will see the following screen -
Screen-shot -


On booting from the Windows Installation DVD, the computer system will copy load some files for the next few minutes and then finally present you with the Windows setup start screen.
The Windows Installation DVD (Windows Vista or Windows 7) is designed for both installing Windows as well as repairing it. In the Windows setup start screen select your preferred language and other details and hit Next.
Screeen-shot -


On the next screen click on Repair your computer to start the advanced Windows Repair Utility.
Screen-shot -
 On clicking on Repair your computer the Windows Repair tool will automatically start searching for the already installed Windows and errors that are stopping Windows to load/boot properly. This may take a few minutes.
Screen-shot -
 If the only problem after updating Debian is with the Windows boot loader then the Windows repair tool usually offers to repair the boot loader. If it does then, click on Repair and Restart and wait for a few minutes to let the Windows repair tool repair the Windows boot loader. If all works well, then after the repair tool reboots your system, you will be able to boot into Windows as you were before updating Debian.
 If the Windows Repair tool does not automatically detect startup problems or is unable to repair the Windows Boot Loader then you need to manually re-install the Windows boot loader. To do this, click on the option - "Use repair tools to fix Windows startup problems".

Use Metode 2
Go to Windows Recovery, choose checkdisk, then you must found use CMD.
From the Startup recovery tools menu select Command Prompt from the available tools.
Screen-shot - 

Next run the following command in the command prompt window -
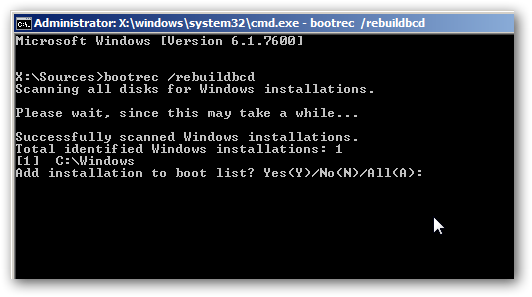
bootrec /rebuildbcd
The above command when executed will search for the available Windows installation on your system. Once it automatically detects the Windows installation on your system, it asks you if you want to add the Windows Installation on your system to the Boot list. Enter Y in order to add the Windows installation to the boot list.
Screen-shot -
 Next, exit the command prompt and reboot your system, and done. You can now normally boot into Windows (access all your files and programs that were there) as you were able to before updating Ubuntu (or updating GRUB).

Now Have Fun., :)

Tuesday, 24 January 2012

Pacman Package Manager on Debian

Getting it on Debian

This part is kind of weird. We want to get pacman on Debian. There isn't an apt package, so what now? Well, we can build a .deb file that installs pacman so we can use PKGBUILDs. Basically, we use a package management system to install a package management system.

There's gotta be a "Yo Dawg" in there somewhere.

Get it pacman arch and be sure to get its dependency libdownload.

A look at some PKGBUILDs

Let's take a look some PKGBUILDs that we use at Kickball Labs.
The first is a simple PKGBUILD for ltrace, a program like strace but for library calls. It just downloads the source, passes in some custom options to configure, builds the binary, and then installs to the package directory.

pkgname=ltrace
pkgver=0.5.1
pkgrel=1
pkgdesc="ltrace is a debugging program which runs a specified command until it exits"
url="http://packages.debian.org/unstable/utils/ltrace"
arch=('x86_64')
source=(http://ftp.debian.org/debian/pool/main/l/ltrace/${pkgname}_${pkgver}.orig.tar.gz)

build()
{
  cd $startdir/src/$pkgname-$pkgver
  ./configure --prefix=/custom --sysconfdir=/custom/etc
  make || return 1
  make DESTDIR=$startdir/pkg install

Conclusion

Package management is painful. If you have any plans on building a service that scales to multiple machines, you had better have a good solution for creating and distributing packages. pacman is good for this because:
  1. It's easy to learn and use, encouraging you to make everything (from libraries to configuration files and more) a PKGBUILD.
  2. The simple plain text file format works great with your source control system of choice.
  3. Applied a patch you didn't like? Just roll the PKGBUILD file back with your package manager.
  4. Create a PKGBUILD repository by just putting the tarballs generated from your PKGBUILD files in a directory and pointing a web server at it. This is great for bringing up new hardware in a datacenter - just install pacman, point it at your repository, and install your base package which sets up the all your passwd, host, or other config files. 
When patching a Debian package, you do not have to get the original source and add all the Debian meta-stuff to it. You can just use apt-get source to get hold of Debian's source package, do the stuff you want to change and then run dpkg-buildpackage

Saturday, 17 December 2011

Disable ipv6 on Debian HOW TO

I’ve recently installed a new LDAP server on Debian Lenny and I wanted to disable IPv6 as it is unnecessary for me in this moment. With netstat I checked the listening processes:
netstat -tunlp
Active Internet connections (only servers)
Proto Recv-Q Send-Q Local Address Foreign Address State PID/Program name
tcp 0 0 0.0.0.0:389 0.0.0.0:* LISTEN 2226/slapd
tcp 0 0 0.0.0.0:22 0.0.0.0:* LISTEN 2215/sshd
tcp6 0 0 :::389 :::* LISTEN 2226/slapd
tcp6 0 0 :::22 :::* LISTEN 2215/sshd

and lsmod showed something like this:
Module Size Used by
ipv6 235364 12
...

So, to disable IPv6 I changed /etc/modprobe.d/aliases:
...
# alias net-pf-10 ipv6
# Disable ipv6
alias net-pf-10 off
alias ipv6 off
...


put AddressFamily inet into /etc/ssh/ssh_config - restart ssh
in /etc/modprobe.d/blacklist.conf setting blacklist ipv6
 
I also disabled these lines in /etc/hosts to avoid confusions:
...
## The following lines are desirable for IPv6 capable hosts
#::1 localhost ip6-localhost ip6-loopback
#fe00::0 ip6-localnet
#ff00::0 ip6-mcastprefix
#ff02::1 ip6-allnodes
#ff02::2 ip6-allrouters
#ff02::3 ip6-allhosts


disabled these lines in /etc/avahi_daemon.conf too :
...
/etc/avahi/avahi-daemon.conf -> say use-ipv6=no

BIND. Ensure listen-on-v6 { none; }; in /etc/bind/named.conf.options. Restart bind9.


APACHE2. Ensure Listen 0.0.0.0:80 in /etc/apache2/ports.conf file. Restart apache2.


Just add this option to your kernel boot line:
ipv6.disable=1 (Press e to edit at the grub boot screen ...)

NTP. Ensure -4 option is set in /etc/default/ntp (e.g. NTPD_OPTS='-4 -g'). Restart ntp.

If you like that, you can put this in /etc/default/grub:

GRUB_CMDLINE_LINUX="ipv6.disable=1"

and then run update-grub

The next time the system boots it will have ipv6 disabled. Let verify it with:
netstat -tunlp
Here is a sample output:
Active Internet connections (only servers)
Proto Recv-Q Send-Q Local Address     Foreign Address   State       PID/Program name
tcp        0      0 192.168.10.2:53   0.0.0.0:*         LISTEN      895/named       
tcp        0      0 127.0.0.1:53      0.0.0.0:*         LISTEN      895/named       
tcp        0      0 0.0.0.0:22        0.0.0.0:*         LISTEN      734/sshd        
tcp        0      0 127.0.0.1:953     0.0.0.0:*         LISTEN      895/named       
udp        0      0 192.168.10.2:53   0.0.0.0:*                     895/named       
udp        0      0 127.0.0.1:53      0.0.0.0:*                                     


Finally I restarted the server.
shutdown -r now
lsmod|grep ipv6
...

Thursday, 8 December 2011

Wireless on Debian HOW TO

Broadcom BCM4311, BCM4312, BCM4313, BCM4321, BCM4322, BCM43224, BCM43225, BCM43227, BCM43228 devices (wl) on Debian

    The proprietary Broadcom wl driver (aka broadcom-sta) provides support for some Broadcom-based PCI hardware. It includes a binary-only component targeted for the x86 or x86-64 architecture. Supported devices are listed at the end of this page.
     The BCM4313, BCM43224 and BCM43225 chipsets are alternatively supported by the brcm80211 driver.

Instalation :

Wheezy

1.Add a "non-free" component to /etc/apt/sources.list, for example:
# Debian Wheezy/7.0 testing
deb http://ftp.us.debian.org/debian squeeze main non-free contib
deb-src http://ftp.us.debian.org/debian squeeze main non-free contib

2.Update the list of available packages. Install the Module-Assistant and Wireless-Tools package.
              # aptitude update
          # aptitude install module-assistant wireless-tools
 
3.Build and install a broadcom-sta-modules-* package for your system, using Module-Assistant: 
          # m-a a-i broadcom-sta
 
if something wrong with your installation, just install Realtek Firmware :
# aptitude install firmware-realtek
 
4.Blacklist the brcm80211 module, to prevent it conflicting for support of BCM4313, BCM43224 and BCM43225 devices:
# echo blacklist brcm80211 >> /etc/modprobe.d/broadcom-sta-common.conf
 
5.Rebuildyour initial ramdisk, to blacklist modules defined at /etc/modprobe.d/broadcom-sta-common.conf within initramfs:  
# update-initramfs -u -k $(uname -r)
 
6.Unloaad conflicting modules:

# modprobe -r b44 b43 b43legacy ssb brcm80211
 
7.Load the wl module:
# modprobe wl
 
8.Verify your device has an available interface:  
# iwconfig
 
9.Reebot your System n you will see wifi confirmation that your connection can estabilished show on Network Manager 
#shutdown -r now

Module Assistant on Debian How To

Module Assistant on Debian

module-assistant (often abbreviated as m-a) can be used in command line or in interactive mode :


To keep it simple, we run all the commands as root,
so open a terminal as root

in Gnome Application menu/Accessories/Root Terminal.
or KDE menu/System/More Applications/Terminal Program - Super User Mode.

First we need to install module-assistant (you can re-run that command if you aren't sure).
apt-get install module-assistant

Then we get module-assistant to download the headers corresponding to the current kernel, and other 'build-essential' tools... simply run :
 
m-a prepare


Update list of module :

      m-a update

INTERACTIVE MODE

     If you don't like typing commands, you can run module-assistant in interactive mode. simply type : 
 
m-a
 
     This will take you to a menu with the options: Overview, Update, Prepare, Select and Exit. Prepare will configure and install any packages you need in order to compile kernel modules (e.g. kernel headers, gcc, etc). The Select menu takes you to a screen where you can select which modules you want to compile.
m-a -t list | grep -E '^[^ ].*\(' | cut -d " " -f 1 | sort
If you want the package description, use:
for x in $( m-a -t list | grep -E '^[^ ]\
.*(' | cut -d " " -f 1 | sort ) ;\
do  echo Package: $x ; (apt-cache show $x |\
grep -E '^(Description|Package| )' ) \
2>&1  ; echo  ; done | uniq  > /tmp/m-a

Monday, 5 December 2011

IPTABLES on Debian ?? HOW TO

Installing IPTABLES on Debian ::

install required component, all done with one command :

aptitude update && aptitude -u full-upgrade && aptitude install iptables && aptitude clean

or u can check the cache that the programs installed correctly on your machine :

                 dpkg -l iptables

n u will see the screenshot like this :
and seewhere is the places that already installed :
if you cannot see that, then it done with :

                 apt-get update && apt-get install iptables

now, we need to create test rules.,

                 nano /etc/iptables.angel.rules

you can downloads my rules from this site

store them :

                   iptables-restore < /etc/iptables.angel.rules

and :           iptables -L

if you satisfied with that, now we need to save them :

                    iptables-save > /etc/iptables.devil.rules

and init the scripts on network interfaces 

                     nano /etc/network/if-pre-up.d/iptables

inside if.pre.up file you create, insert :
  #!/bin/bash
  /sbin/iptables-restore < /etc/iptables.devil.rules

and now we make it exetutable

                      chmod +x /etc/network/if-pre-up.d/iptables

we must add too the scripts on network configurations :

                      nano /etc/network/interfaces

and insert : "pre-up iptables-restore < /etc/iptables.devil.rules"

after two files, look at screenshot :

done.!!